The sight of a perfectly grilled strip steak, with its caramelized crust and rosy center, is enough to make any food lover’s heart skip a beat. That rich, beefy flavor and tender texture isn’t just steakhouse magic – it’s completely achievable in your backyard. Today, I’m sharing my tried-and-true method for grilling the perfect New York Strip steak, complete with a zesty chimichurri sauce and a fresh garden salad.
The Secret Starts with Selection
Before we fire up the grill, let’s talk about choosing the right steak. A quality New York Strip should have:
- Visible marbling (those white streaks of fat running through the meat)
- A thickness of at least 1-1.5 inches
- A rich, red color
- USDA Choice grade or higher
I prefer selecting strip steaks from the center cut of the loin, where you’ll find the best balance of tenderness and flavor. While Prime grade is excellent, a well-marbled Choice grade steak will give you outstanding results at a more reasonable price point.
Preparation: The Foundation of Flavor
The key to steakhouse-quality results starts long before the steak hits the grill. Here’s my preparation process:
- Remove your steak from the refrigerator 45-60 minutes before grilling. This crucial step allows the meat to reach room temperature, ensuring even cooking.
- Pat the steak thoroughly dry with paper towels. This step is non-negotiable – moisture is the enemy of a good crust.
- Season generously with kosher salt and freshly ground black pepper. Don’t be shy here; you want to see the seasoning clearly on the meat’s surface.
- While the steak comes to temperature, prepare your grill for two-zone cooking (more on this below).
The Grilling Process: Temperature, Timing, and Technique
Setting up your grill properly is crucial for the perfect steak. Here’s how I do it:
Two-Zone Fire Setup:
- Turn one side of your grill to high heat (around 450-500°F)
- Keep the other side at medium heat (around 350°F)
- Clean and oil your grates thoroughly
The actual grilling process follows these steps:
- Start by searing the steak on the high-heat side. Place it at a 45-degree angle to the grates for those coveted crosshatch marks.
- After 3-4 minutes, rotate the steak 90 degrees (but don’t flip it yet) for another 2-3 minutes.
- Flip the steak and repeat the process on the second side.
- Once you’ve achieved a nice crust, move the steak to the medium-heat zone to finish cooking to your desired doneness.
Temperature Guide:
- Rare: 125°F
- Medium-Rare: 135°F
- Medium: 145°F
- Medium-Well: 150°F
- Well Done: 160°F
Remember to use a reliable meat thermometer – visual cues alone can be misleading.
The Essential Rest Period
Once your steak reaches temperature (I recommend pulling it about 5 degrees below your target), remove it from the grill and let it rest on a cutting board for 8-10 minutes. This isn’t just tradition – it’s science. During the rest period, the meat’s juices redistribute, ensuring every bite is moist and flavorful.
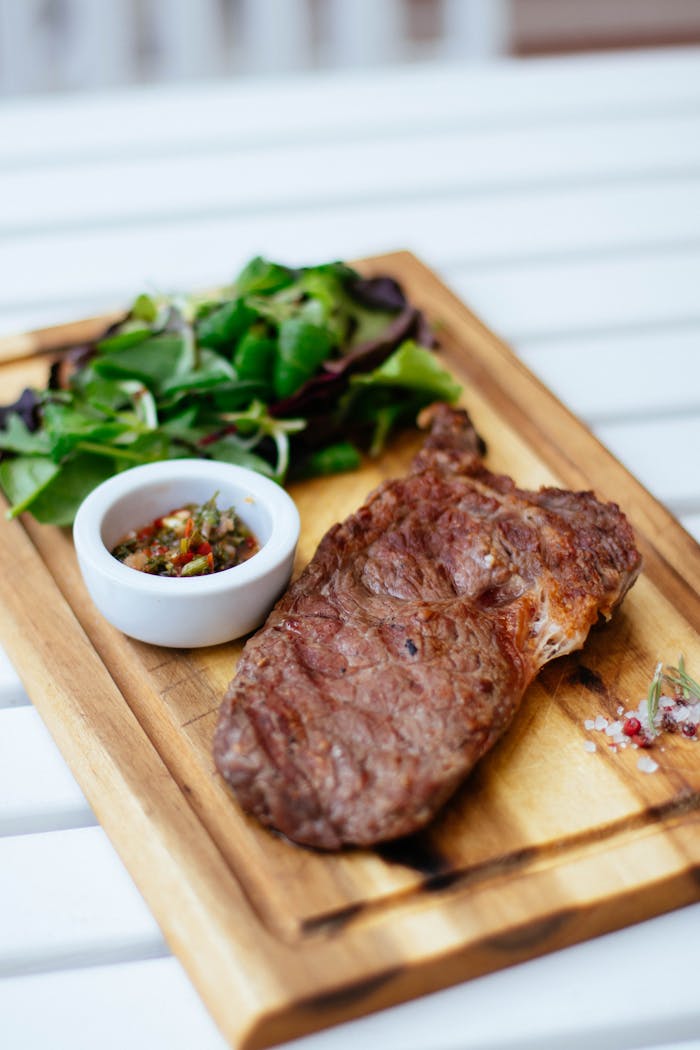
Elevating Your Steak: The Supporting Cast
In the photo, you’ll notice two crucial components that elevate this dish from good to exceptional:
The Chimichurri Sauce:
This Argentine classic brings bright, herbaceous notes that cut through the rich meat perfectly. Here’s my quick recipe:
- 1 cup fresh parsley, finely chopped
- 3 cloves garlic, minced
- 2 tablespoons fresh oregano
- 1/4 cup red wine vinegar
- 1/2 cup extra virgin olive oil
- 1 red chili, finely diced (optional)
- Salt and pepper to taste
Mix all ingredients and let sit for at least 30 minutes before serving.
The Garden Salad:
A simple mix of fresh greens provides a light, crisp contrast to the rich steak. I prefer:
- Mixed baby greens
- Arugula for pepper notes
- Light vinaigrette (3 parts oil to 1 part vinegar)
Plating and Presentation
Notice how the steak is presented in the photo – sliced against the grain, which ensures maximum tenderness. The chimichurri sauce is served on the side, allowing diners to control their portion, while the fresh greens add color and balance to the plate.
Troubleshooting Common Issues
Even experienced grillers sometimes encounter challenges. Here are solutions to common problems:
- Flare-ups: Keep a spray bottle of water handy and move the steak to the cooler zone if necessary.
- Uneven cooking: Ensure your steak has reached room temperature before grilling and maintain proper grill zones.
- Tough texture: Check that you’re slicing against the grain and letting the meat rest properly.
Final Thoughts
Grilling the perfect strip steak is part science, part art, but wholly achievable. The key elements to remember are:
- Quality meat selection
- Proper temperature management
- Patience during the cooking and resting process
- Complementary sides and sauces
With practice, you’ll develop an intuition for timing and temperature that will make you the go-to grill master in your circle. Remember, every grill is different, so don’t be afraid to adjust these guidelines to suit your equipment and preferences.
Whether you’re grilling for a special occasion or simply craving a great steak, this method will help you achieve steakhouse-quality results right in your backyard. And there’s nothing quite like the satisfaction of cutting into a perfectly grilled strip steak that you’ve prepared yourself.